

Table of Contents
Introduction
There’s nothing quite like the rich, comforting flavor of braised chicken—tender, juicy meat infused with deep, savory flavors. But what if you could take it a step further and get that crispy, golden-brown skin on top? 🤤 That’s exactly what we’re going to achieve in this recipe!
Braising is one of the best cooking methods for chicken, allowing the meat to become incredibly moist while soaking up all the delicious flavors from your broth, aromatics, and seasonings. However, the biggest challenge with braising is keeping that skin crispy. Most people end up with soft, rubbery skin instead of the crispy, golden perfection they crave.
In this recipe, I’ll show you the perfect step-by-step process to make braised chicken in the oven with crispy skin—so you get the best of both worlds: ultra-tender meat and shatteringly crispy skin. 🍗🔥
Why You’ll Love This Recipe:
✔ Juicy and Flavorful: The slow-cooked braising process ensures the chicken stays moist and flavorful.
✔ Perfectly Crispy Skin: Special techniques guarantee that the skin crisps up beautifully.
✔ One-Pan Wonder: Easy cleanup and packed with deep, delicious flavors.
✔ Customizable: You can tweak the flavors and ingredients to match your taste!
Let’s dive in! 👩🍳👨🍳
Why Braising is the Best Cooking Method for Chicken
What is Braising?
Braising is a two-step cooking method that involves:
1️⃣ Searing the food at high heat to develop a rich, caramelized crust.
2️⃣ Slow-cooking in liquid at a lower temperature to create tender, fall-off-the-bone meat.
It’s the ideal method for cooking bone-in, skin-on chicken because it locks in moisture while allowing all the flavors to meld together.
The Science Behind Crispy Chicken Skin
Achieving crispy skin while braising requires a little science. Chicken skin contains collagen and fat, which, when cooked properly, can become beautifully crispy instead of soggy. Here’s how:
✅ Drying the Skin Before Cooking: Moisture is the enemy of crispiness! Always pat your chicken dry with a paper towel before seasoning.
✅ Searing at High Heat First: This jump-starts the crisping process and builds flavor.
✅ Braising with Skin Above the Liquid: Keeping the skin exposed prevents it from getting soggy.
✅ Finishing with a Blast of Heat: Broiling or roasting at the end ensures ultra-crispy skin.
Why the Oven Works Best for Braised Chicken
While braising can be done on the stovetop, using the oven provides even heat distribution and ensures that the chicken cooks evenly. Plus, finishing the dish uncovered in the oven helps crisp up that skin even more! 🔥
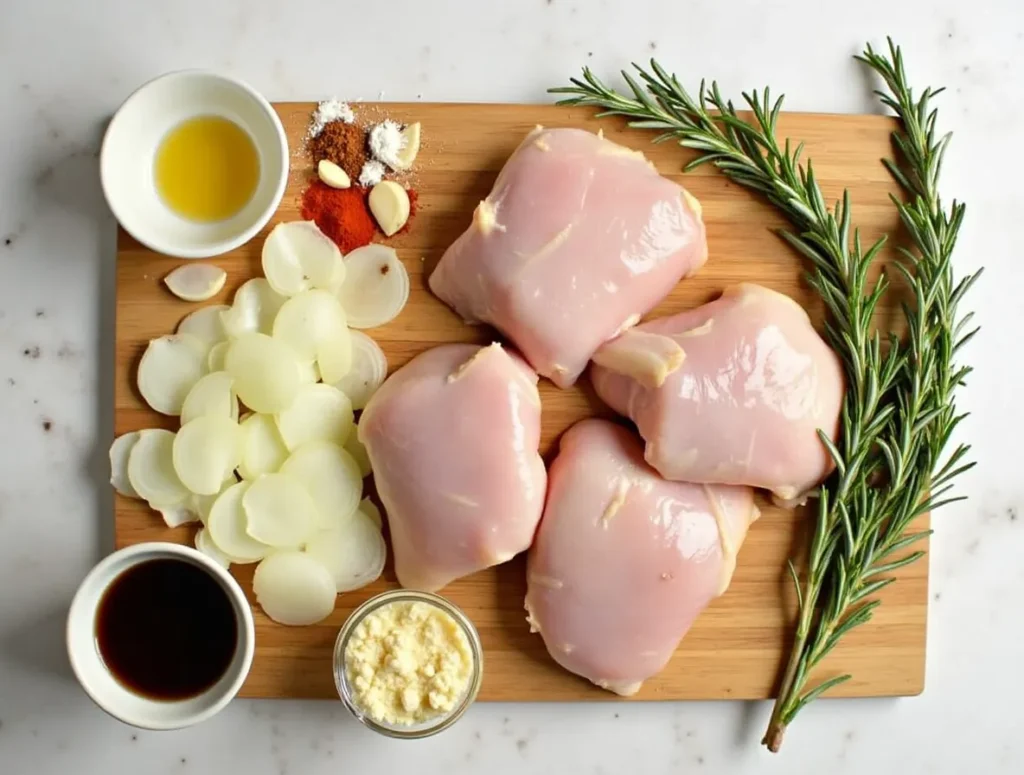
Ingredients for the Perfect Braised Chicken with Crispy Skin
Essential Ingredients for Flavorful Chicken
To make this recipe, you’ll need:
| Ingredient | Quantity |
|---|---|
| Bone-in, skin-on chicken thighs or drumsticks | 4-6 pieces |
| Olive oil or butter | 2 tbsp |
| Onion (sliced) | 1 medium |
| Garlic (minced) | 3 cloves |
| Chicken broth | 1 ½ cups |
| White wine (optional) | ½ cup |
| Fresh thyme or rosemary | 2 sprigs |
| Bay leaves | 2 leaves |
| Paprika | 1 tsp |
| Salt and black pepper | To taste |
Best Seasonings for Crispy Skin
To really enhance the crispiness and flavor of the chicken skin, try seasoning it with:
✔ Kosher salt: Helps draw out moisture for extra crispiness.
✔ Black pepper & paprika: Adds a smoky depth of flavor.
✔ Garlic powder & onion powder: Boosts savory notes.
Optional Additions for Extra Flavor
If you want to experiment, here are a few delicious additions:
- Lemon zest: Adds brightness and enhances the aroma. 🍋
- Mushrooms: Give the braising liquid a deep umami flavor. 🍄
- Dijon mustard: Provides a tangy complexity.
Step-by-Step Braised Chicken in the Oven with Crispy Skin Recipe
Now, let’s get to the main event! Follow these simple steps to create the perfect crispy-skinned braised chicken.
1. Preparing the Chicken for Maximum Crispiness
📌 Tip: Take the chicken out of the fridge 30 minutes before cooking to let it come to room temperature—this helps with even cooking!
1️⃣ Pat the chicken dry using a paper towel to remove excess moisture.
2️⃣ Season generously with salt, pepper, and paprika on both sides.
3️⃣ Let it sit for about 10 minutes to allow the salt to penetrate the skin.
2. Searing the Chicken: The Key to Crispy Skin
This is the most important step for achieving that crispy texture.
1️⃣ Heat 2 tbsp of olive oil in a large oven-safe skillet or Dutch oven over medium-high heat.
2️⃣ Place the chicken skin-side down and sear for 4-5 minutes without moving it. This helps develop that golden crust! 🌟
3️⃣ Flip and sear the other side for 2-3 minutes, then transfer to a plate.
👉 Block Quote:
“The secret to crispy skin is patience—let it sear undisturbed until it forms a golden crust!”
3. Braising the Chicken: Slow Cooking for Tender Meat
1️⃣ In the same pan, add sliced onions and minced garlic. Sauté until soft.
2️⃣ Pour in ½ cup white wine and let it simmer for 1-2 minutes to cook off the alcohol.
3️⃣ Add 1 ½ cups chicken broth, thyme, bay leaves, and any extra seasonings.
4️⃣ Return the chicken to the pan, skin-side up. The skin should NOT be submerged in liquid!
5️⃣ Cover and transfer to a preheated 350°F (175°C) oven for 30-40 minutes.
4. Finishing in the Oven for Ultimate Crispiness
1️⃣ Remove the lid and increase the oven temperature to 425°F (220°C).
2️⃣ Let the chicken roast uncovered for 10-15 more minutes until the skin is deeply golden and crispy.
3️⃣ For extra crispiness, broil for 2-3 minutes at the end. 🔥
👉 Block Quote:
“That final blast of heat is what transforms the skin from soft to irresistibly crispy!”
Common Problems and How to Fix Them
Even the best home cooks sometimes run into issues when making braised chicken in the oven with crispy skin. Here are some common problems and how to fix them so your dish turns out perfect every time. 👌
Why Is My Chicken Skin Not Crispy?
If your chicken skin isn’t as crispy as you’d like, these could be the reasons:
❌ The skin was too wet before cooking.
💡 Fix: Always pat the chicken dry with a paper towel before seasoning. Moisture prevents the skin from crisping properly.
❌ The chicken was cooked entirely covered.
💡 Fix: Always finish the chicken uncovered in the oven at a high temperature (425°F+). This dries out the skin and makes it crispy.
❌ It wasn’t seared properly before braising.
💡 Fix: Searing the chicken skin-side down in a hot pan for at least 4-5 minutes is crucial. If the skin doesn’t turn golden brown in that time, your pan isn’t hot enough!
How to Prevent Chicken from Drying Out
One of the biggest fears when cooking chicken is ending up with dry, tough meat. Here’s how to keep it juicy and tender:
✅ Use bone-in, skin-on chicken. The bone helps retain moisture, and the skin acts as a natural barrier against dryness.
✅ Braise at a low temperature (350°F). Cooking too fast at high heat can dry out the meat before it becomes tender.
✅ Don’t overcook! Chicken is done when it reaches 165°F (74°C) internally. Use a meat thermometer to check.
✅ Rest the chicken before serving. Letting it sit for 5 minutes after baking helps redistribute the juices inside.
Fixing Overly Greasy Chicken
Chicken thighs and drumsticks release natural fat when cooking. If the dish feels too greasy:
💡 Fix: Skim off some excess fat from the braising liquid before serving.
💡 Fix: Use a paper towel to blot extra oil off the skin before the final crisping stage.
💡 Fix: Add a splash of vinegar or lemon juice to cut through the richness. 🍋
Best Side Dishes to Serve with Braised Chicken
Pairing your crispy braised chicken with the right side dishes makes for a perfect meal! Here are some top choices:
Classic Side Dishes
🥔 Creamy Mashed Potatoes – The rich gravy from the braised chicken goes perfectly with buttery mashed potatoes.
🍞 Crusty Bread – Use it to soak up all that delicious braising sauce.
Healthy Side Dish Alternatives
🥦 Roasted Vegetables – Carrots, Brussels sprouts, or asparagus add color and nutrition.
🥗 Fresh Salad – A simple arugula or spinach salad with lemon vinaigrette cuts through the richness.
Sauce Pairings for Braised Chicken
🔥 Garlic Butter Sauce – Adds extra richness.
🌿 Chimichurri Sauce – Bright and herby for a fresh contrast.
🍷 Red Wine Reduction – Deepens the dish’s flavors with a gourmet touch.
Nutrition Facts and Health Benefits of Braised Chicken
Braising chicken is not only delicious but can also be a healthy meal option! Let’s break down its nutrition profile.
Macronutrient Breakdown
Here’s an estimated nutrition table per serving (1 chicken thigh + sauce):
| Nutrient | Amount |
|---|---|
| Calories | 350 kcal |
| Protein | 30g |
| Fats | 22g |
| Carbohydrates | 5g |
| Fiber | 1g |
Health Benefits of Braised Chicken
✅ High in Protein: Great for muscle growth and repair.
✅ Rich in Collagen: Helps support skin, hair, and joint health.
✅ Full of Flavor Without Deep Frying: Unlike fried chicken, this method gives you crispy skin with less oil.
How to Make a Healthier Version
💡 Reduce fat by using chicken breast instead of thighs.
💡 Use a low-sodium broth to cut down on salt intake.
💡 Add more veggies like bell peppers, mushrooms, or spinach for extra nutrients.
Frequently Asked Questions (FAQs)
Can I Use Boneless Chicken for Braising?
Yes, but bone-in, skin-on chicken is preferred for the best flavor and moisture. If using boneless, reduce the cooking time slightly to prevent overcooking.
What’s the Best Pan for Braising Chicken?
A Dutch oven or a deep, oven-safe skillet with a lid works best. These retain heat well and distribute it evenly.
Can I Make This Recipe in a Slow Cooker?
Yes! Follow the same steps to sear the chicken first, then transfer everything to a slow cooker and cook on low for 4-6 hours. Finish in the oven to crisp up the skin.
Conclusion & Final Tips for Success
🔥 Braising chicken in the oven gives you the best of both worlds—deep, comforting flavors and perfectly crispy skin. By following the searing, slow-cooking, and crisping process, you’ll get juicy, tender meat with an irresistible crunch.
Final Tips:
✅ Always pat the chicken dry before cooking.
✅ Sear skin-side down until golden brown.
✅ Keep the skin above the braising liquid.
✅ Finish in a hot oven to achieve maximum crispiness.
Now, it’s time to grab your ingredients and try this amazing recipe! 🍗🔥 Let me know how it turns out! 😊