
Introduction
Grilling chicken breast on a pellet grill is a game changer for home cooks and BBQ enthusiasts alike. While chicken breast is notoriously easy to overcook and dry out, a pellet grill offers precise temperature control and consistent heat—ideal for locking in moisture and flavor. Whether you’re hosting a backyard party or preparing a healthy weeknight dinner, mastering the technique of grilling chicken breast on a pellet grill is both rewarding and delicious..3 oz Chicken Breast
In this ultimate guide, we’ll walk you through the process step-by-step—from prep and seasoning to grilling and serving. With tips from pitmasters and proven techniques, you’ll never have to worry about dry, bland chicken breasts again. Let’s fire up that pellet grill and get cooking!
Why Choose a Pellet Grill for Chicken Breast
Even Heat and Temperature Control
Pellet grills are revered for their ability to maintain steady temperatures. This makes them ideal for lean meats like chicken breast that can easily dry out on high heat or inconsistent flames. The fan-driven convection system ensures even cooking, minimizing the chances of burning the outside while the inside stays raw.
Natural Smoky Flavor
One of the key benefits of using a pellet grill is the smoky flavor imparted by wood pellets. Depending on your choice of wood—like apple, hickory, or cherry—you can subtly enhance the taste of your chicken. Unlike gas grills, which provide heat without flavor, pellet grills double as both an oven and a smoker.
Consistency and Ease
Pellet grills are perfect for beginners and seasoned grillers alike. With digital controllers and programmable settings, you don’t have to babysit your grill constantly. This allows for hands-off cooking while still achieving gourmet results every time..Stoved Chicken Recipe
Preparing Your chicken breast on pellet grill
Selecting the Best Chicken Breasts
Start with high-quality, boneless skinless chicken breasts. Look for pieces that are similar in size and thickness for even cooking. Organic or free-range chicken often has better texture and taste.
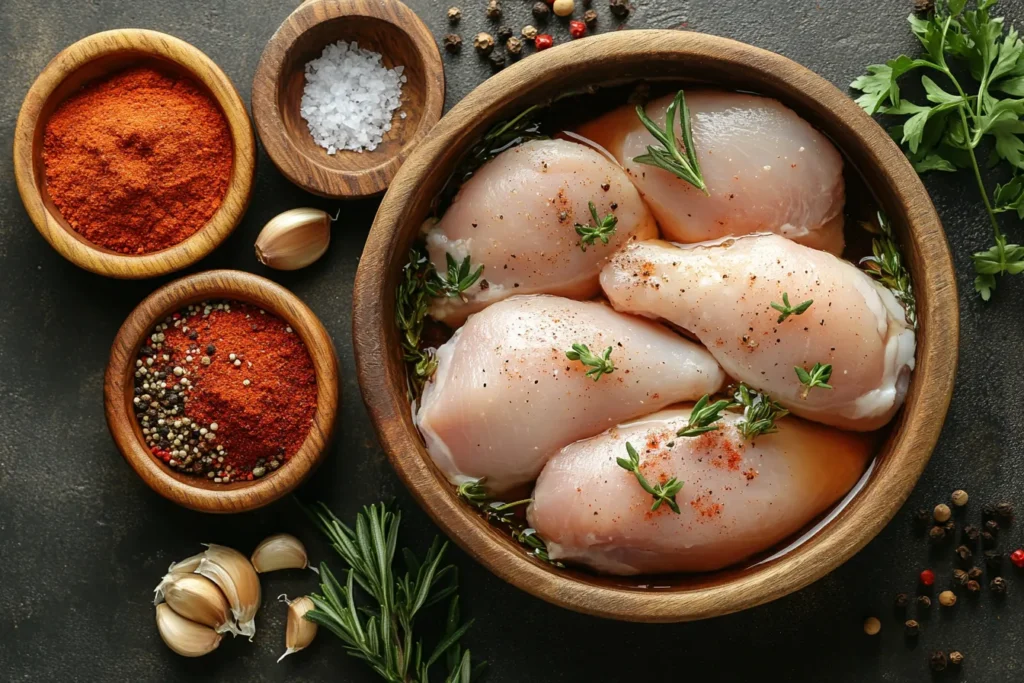
Brining: Why It Matters
Brining your chicken breasts in a saltwater solution for 30 minutes to 2 hours helps retain moisture during cooking. Add a tablespoon of salt per cup of water and optional flavorings like sugar, peppercorns, or garlic. This simple step can dramatically improve juiciness.
Seasoning Blends for Flavor
Dry Rub Recipes
For a classic BBQ flavor, try a dry rub with smoked paprika, garlic powder, onion powder, black pepper, and a touch of brown sugar. Coat your chicken evenly and let it sit for at least 15 minutes, or up to overnight.
Marinades & Injectables
Marinating your chicken in citrus-based or yogurt-based blends can tenderize the meat and infuse it with flavor. Alternatively, use an injector to infuse seasoning deep inside the breast—perfect for extra juicy results..Chicken Cheez
Pellet Grill Setup & Temperature Guide
Choosing the Right Pellet Type (Flavor Profiles)
The flavor of your grilled chicken breast is heavily influenced by the type of wood pellets you use. Each wood imparts a unique smoke signature:
- Applewood: Mild and slightly sweet, perfect for chicken and other light meats.
- Hickory: Strong and bold, ideal if you want a more robust smoky flavor.
- Cherry: Adds a touch of sweetness and gives a beautiful reddish hue to the chicken.
- Pecan: Mellow and nutty, great for a balanced flavor.
For beginners, apple and cherry are safe choices. You can even mix pellets to create a custom smoke profile.
Setting and Monitoring Ideal Temperatures
Temperature is key when grilling chicken breast. Here are the key benchmarks:
- Preheat your pellet grill to 375°F (190°C). This is the sweet spot for crisping the outside while keeping the inside moist.
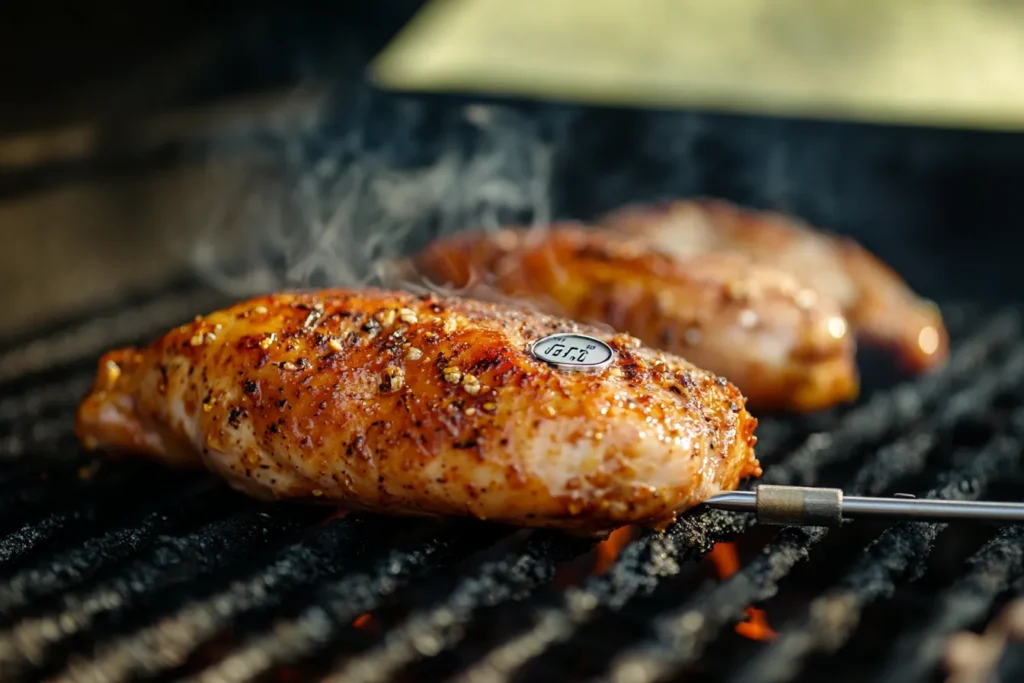
- Internal temperature target: 165°F (74°C). Always use a digital probe thermometer to avoid guesswork.
- For extra control, consider setting your grill to 225°F for a slower smoke-first approach, then crank it to 400°F for a final sear.
Avoid opening the lid too often, as this causes heat loss and fluctuations, which can dry out the chicken.
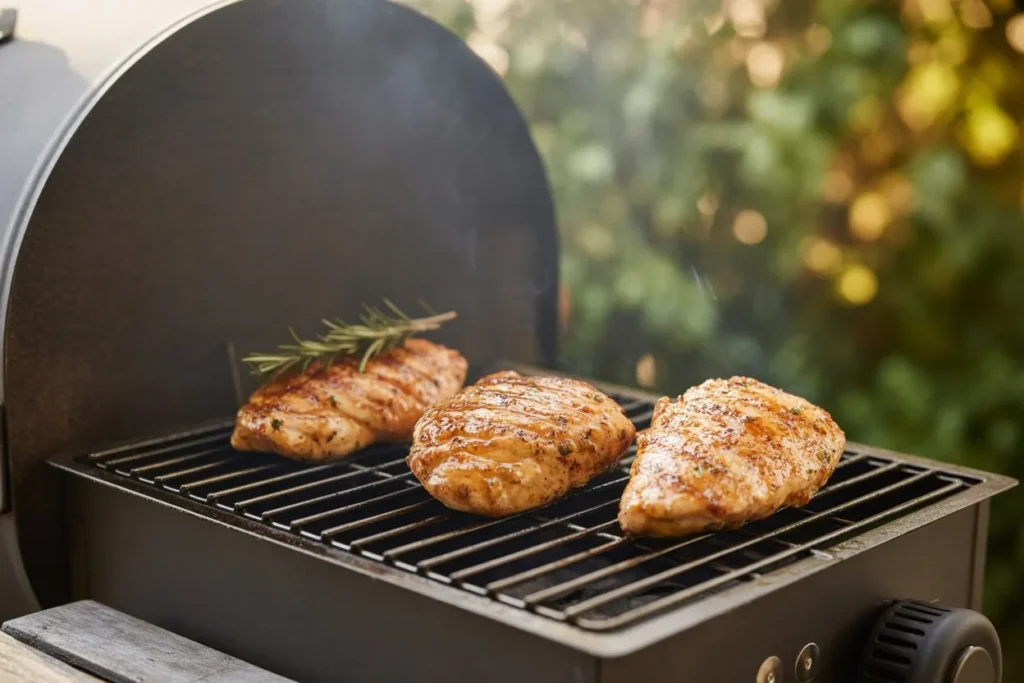
Grill Placement, Size, and Spacing
Space out the chicken breasts evenly on the grates to ensure consistent airflow and cooking. Use indirect heat if your grill runs hotter on one side. Avoid overcrowding, which can lead to uneven results.
Use a grill mat or wire rack if your grates tend to stick, or lightly oil the grates before placing the chicken on.
Step-by-Step Cooking Method
Preheating the Grill
Before anything goes on the grates, preheat your pellet grill with the lid closed for 10–15 minutes. This ensures a stable cooking temperature and burns off any leftover residues from previous sessions.
Searing vs Low-and-Slow Cooking
There are two primary methods to cook chicken breast on a pellet grill:
- Direct High Heat (375–400°F): Great for a quick cook with a light sear. Takes around 20–25 minutes, depending on thickness.
- Low-and-Slow (225–250°F) with a Final Sear: Smoke the chicken until it reaches 145°F, then increase grill temp to 400°F to sear for 3–5 minutes on each side. This method maximizes both flavor and juiciness.
Using a Probe Thermometer for Perfect Doneness
Insert a probe thermometer into the thickest part of the breast (not touching bone). Remove the chicken once it hits 160°F. It will continue to cook from residual heat during the resting phase and safely reach 165°F.
Resting Time and Why It Matters
After cooking, let the chicken rest for 5–10 minutes, tented with foil. This helps redistribute the juices inside the meat instead of spilling out when sliced. Skipping this step can lead to drier results even if the cooking was perfect.
Advanced Tips & Variations
Reverse Sear Technique
For a professional finish, try the reverse sear. Start by smoking the chicken breasts low and slow at 225°F until they reach an internal temp of 145°F. Then crank your grill up to 400–450°F and sear the breasts for 2–3 minutes per side. This method not only locks in moisture but also adds a rich caramelized crust that’s irresistible.
Pro Tip: Reverse searing is especially effective for thicker chicken breasts.
Infusing Extra Smoke (Wood Chunks or Smoke Tubes)
If you want a deeper smoky flavor, consider adding a smoke tube or a few chunks of wood directly to the pellet grill. Apple, cherry, or pecan are excellent choices for poultry. Smoke tubes can burn for hours and provide a denser smoke that intensifies flavor without overpowering the meat.
Bonus Tip: For a subtle twist, soak wood chips in apple juice or white wine before placing them in the smoke tube.
Glazes and Finishing Sauces
Adding a glaze in the last 5–10 minutes of grilling can elevate your chicken breast to gourmet levels. Here are some ideas:
- Honey Mustard Glaze: Mix Dijon mustard, honey, and apple cider vinegar.
- BBQ Glaze: Classic barbecue sauce thinned with apple juice or bourbon.
- Spicy Maple Glaze: Combine maple syrup, chili flakes, and soy sauce.
Brush the glaze lightly and let it caramelize on the grill without burning. Avoid applying glazes too early—sugar-based sauces can burn quickly under high heat.
Troubleshooting Common Issues
Dry Chicken—How to Avoid It
Overcooked chicken breast is the most common issue. Always use a thermometer and remove the meat when it hits 160°F. Brining, marinating, and resting post-cook all contribute to juicy results.
If your chicken is still coming out dry, check for the following:
- Inconsistent grill temps
- Cooking too long without a probe
- Not allowing the chicken to rest
Undercooked Center—What to Check
If the exterior is done but the inside is raw, you may be using too high a temp or placing cold chicken directly on the grill. Let your chicken come to room temp for 20–30 minutes before cooking, and always use indirect heat to ensure even doneness.
Grill Flare-Ups and Temperature Swings
Pellet grills are less prone to flare-ups than charcoal, but grease buildup and hot spots can still cause problems. Clean your grates regularly and avoid fatty marinades that drip excessively.
For temperature swings, check the pellet hopper and fire pot. Low-quality pellets or clogs can lead to inconsistent heat. Using hardwood pellets from a reliable brand like Traeger or Lumber Jack helps maintain stable temps.
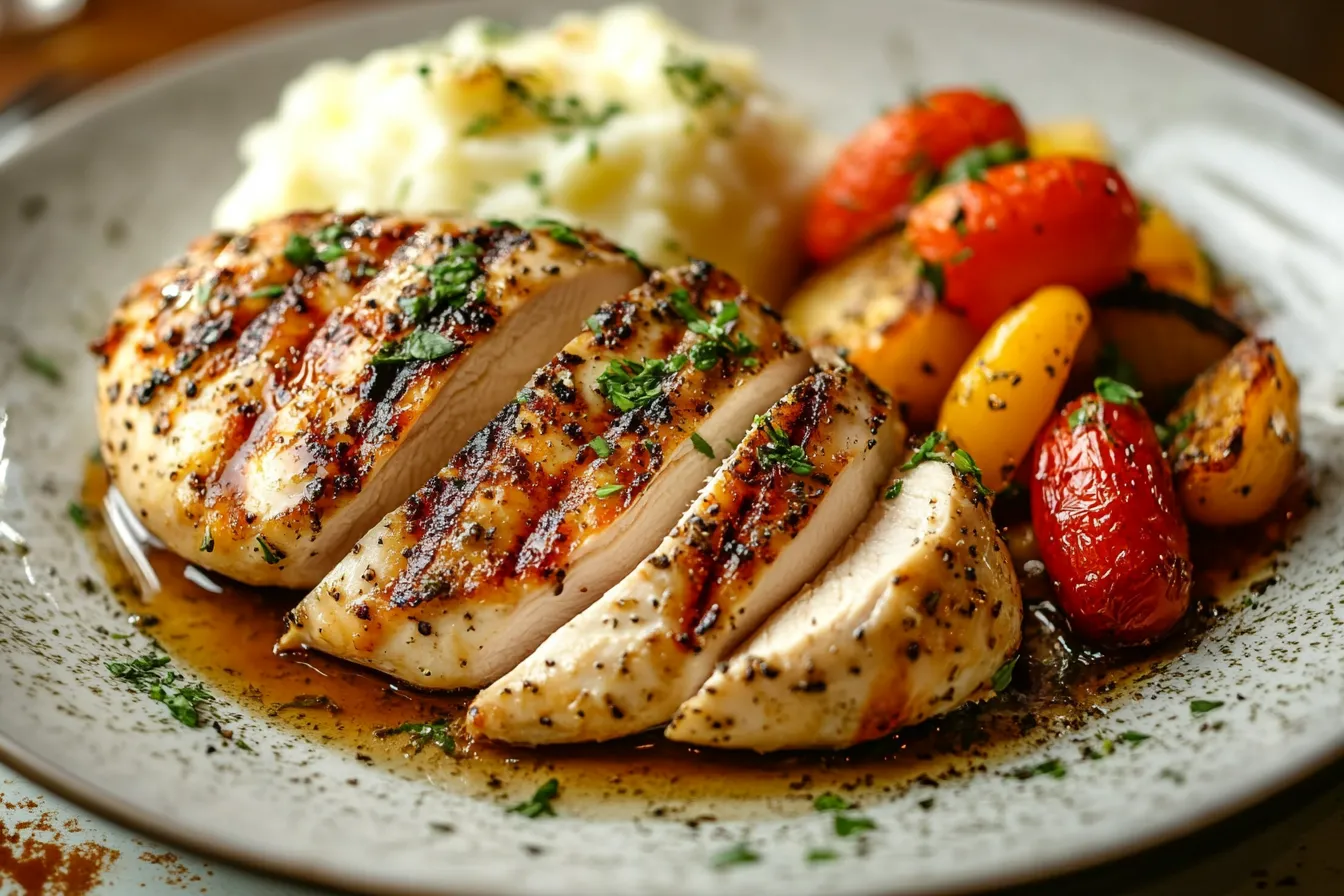
Serving Suggestions & Pairings
Side Dishes That Complement Pellet-Grilled Chicken
A perfectly grilled chicken breast deserves side dishes that enhance its flavors without overpowering them. Here are some go-to pairings:
- Grilled Vegetables: Zucchini, bell peppers, and asparagus grill beautifully alongside chicken breasts.
- Garlic Mashed Potatoes: Creamy and rich, they balance the smokiness of the meat.
- Coleslaw: Adds crunch and a cool contrast to the warm, smoky chicken.
- Grilled Corn on the Cob: A summer BBQ favorite that brings sweetness to your plate.
- Wild Rice or Quinoa: Nutty grains that complement herb-marinated chicken.
Add a squeeze of lemon over everything just before serving for a bright finish.
Sauce Ideas and Finishing Garnishes
While your chicken might be juicy and flavorful on its own, adding sauces and garnishes can elevate the dish further:
- Chimichurri Sauce: Fresh, herbaceous, and vibrant.
- Creamy Garlic Parmesan Sauce: Ideal for Italian-style grilled chicken.
- Spicy Mango Salsa: A fruity, spicy topping perfect for summer.
Garnishes like chopped fresh parsley, green onions, or shaved parmesan not only add flavor but also improve plate presentation.
FAQ
What Internal Temperature Should Chicken Breast Reach?
The USDA recommends an internal temperature of 165°F (74°C) for chicken breast. For best results, remove from the grill at 160°F and let it rest, as the temp will rise slightly.
Can I Smoke and Then Sear?
Yes! This is known as the reverse sear method. It’s ideal for thick chicken breasts. Smoke at 225°F until the internal temp is about 145°F, then sear at 400–450°F until it reaches 160–165°F.
How Long Does Chicken Breast Stay Juicy?
If properly brined, grilled to the right temp, and rested, chicken breast remains juicy for up to 2–3 days when stored in the fridge. Wrap it tightly in foil or store in an airtight container.
Pellet Grill vs Gas/Charcoal for Chicken Breast
Pellet grills offer more temperature precision and natural smoke flavor, making them ideal for lean meats like chicken. Gas grills are quick and convenient, while charcoal offers high heat and a deep smoky profile but requires more monitoring.
Should I Brine Every Time?
If you want consistently juicy results—yes. Brining helps prevent over-drying and adds flavor. Even a quick 30-minute brine can make a difference.
Can I Use Frozen Chicken Breasts?
You should never grill frozen chicken breasts directly. Thaw them fully in the fridge first. Grilling frozen meat results in uneven cooking and potential food safety risks.
Conclusion
Mastering the art of grilling chicken breast on a pellet grill is a rewarding process that combines technique, patience, and flavor. From choosing the right wood pellets and brining the meat to dialing in the perfect temperature and timing, each step contributes to that perfectly juicy, smoky bite. Whether you’re cooking for your family on a weeknight or impressing guests at a weekend cookout, the pellet grill transforms simple chicken breasts into gourmet-level meals.
The key takeaway? Use high-quality ingredients, monitor your temperature closely, and don’t skip the resting phase. With the tools and techniques shared in this guide, you’ll consistently deliver chicken breasts that are bursting with flavor—tender, juicy, and never dry.
So go ahead, fire up your pellet grill, and put these methods into practice. The next time someone asks how you made your chicken taste so good, you’ll have the secrets (and skills) to show them.
Name: Chicken Breast on Pellet Grill
Ingredients
Equipment
Method
- Instructions:
- Brine (optional but recommended): Mix water, salt, and sugar in a bowl. Submerge chicken and refrigerate for 30 minutes to 2 hours.
- Prepare grill: Preheat pellet grill to 375°F with lid closed.
- Season chicken: Remove from brine, pat dry, and coat with dry rub (paprika, garlic powder, onion powder, black pepper). Let rest 15 minutes.
- Grill chicken: Place on grill grates. Insert probe thermometer into thickest part. Cook until internal temp reaches 160°F (about 20–25 minutes).
- Optional glaze: Brush glaze on during the last 5 minutes.
- Rest: Remove from grill, tent loosely with foil, and rest 5–10 minutes until internal temp rises to 165°F.