

Introduction: Why These Rolls Are a Game-Changer
There’s something irresistible about freshly baked dinner rolls—especially when they come out of your own kitchen fluffy, golden, and perfectly tender. If you’ve ever tried to replicate that soft, melt-in-your-mouth texture at home but ended up with dense or dry rolls, don’t worry—you’re not alone. The secret? Let your bread machine do the heavy lifting..Best Protein Bagels Recipe
In this guide, we’ll show you exactly how to make fluffy and tender bread machine dinner rolls that rival those from your favorite bakery. You’ll learn how to choose the best ingredients, master the dough cycle, and shape rolls that bake up buttery-soft with just the right touch of chew.
Whether you’re preparing for a family dinner, a holiday feast, or just craving some fresh, warm carbs, this recipe is your ticket to dinner roll perfection. And the best part? It’s practically foolproof, even for beginners.
Why Use a Bread Machine?
Bread machines have become a kitchen essential for busy home bakers. But why are they especially great for dinner rolls?
Time-Saving Convenience
Using a bread machine dramatically cuts down the active time you need to spend in the kitchen. The machine handles mixing, kneading, and the first proofing—leaving you with a smooth, elastic dough that’s ready to be shaped and baked.
Consistent Results Every Bake
Unlike hand-kneading, which can vary based on experience or technique, a bread machine ensures even kneading and accurate temperature control for rising. This consistency leads to reliable, fluffy rolls every single time..Cottage Cheese Bread
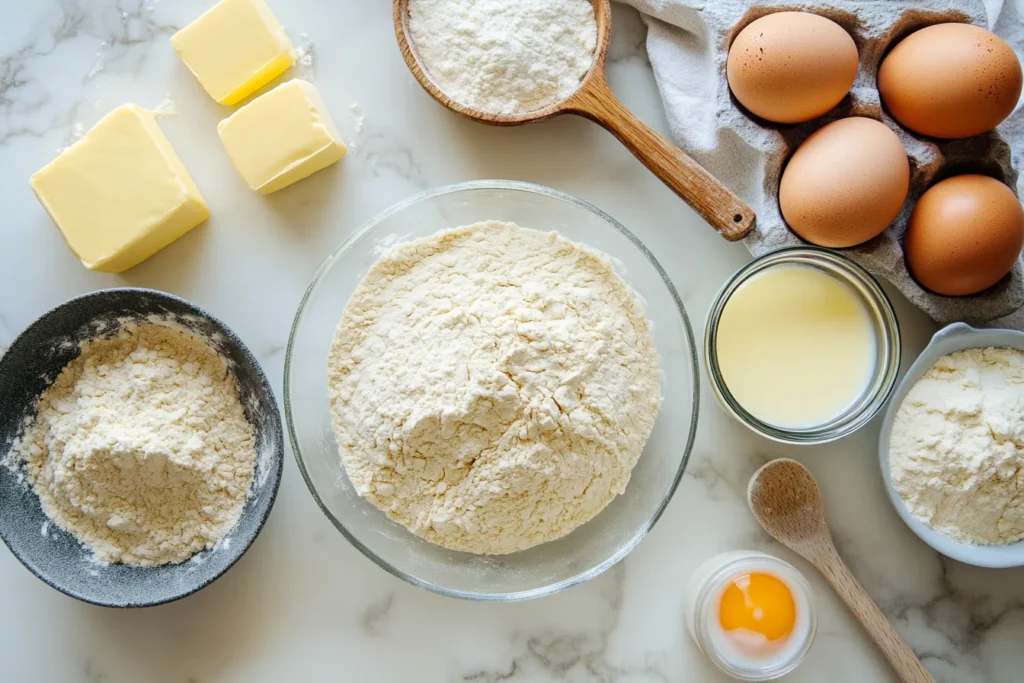
Ingredients You’ll Need
To achieve the perfect texture and flavor, it’s important to understand the role each ingredient plays in your dough.
Key Roles: Flour, Yeast & Dairy
- Bread Flour: Higher in protein than all-purpose flour, it creates the chewy, structured texture ideal for rolls.
- Instant Yeast: Also known as bread machine yeast, it activates quickly and provides a reliable rise.
- Milk & Butter: These add richness and softness to the dough. Whole milk and real unsalted butter give the best results.
Optional Add-ins: Herbs & Seeds
You can easily elevate your rolls with optional ingredients:
- Garlic powder or fresh herbs for a savory touch.
- Poppy or sesame seeds sprinkled on top before baking for added texture and flavor.
Step-by-Step Recipe Guide
Creating flawless dinner rolls with a bread machine is all about timing and technique. Follow these steps to turn simple ingredients into soft, fluffy, golden rolls that will wow any dinner guest.
Dough Cycle Setup
Begin by setting your bread machine to the “Dough” setting. This setting allows the machine to mix, knead, and perform the first rise without baking the dough..Best Protein Bagels Recipe
Preparing the Dough
- Layering Ingredients Correctly:
Always follow your machine’s specific order—usually wet ingredients first, followed by dry ingredients, and yeast last. This prevents premature activation of the yeast. - Essential Ingredients:
- ¾ cup warm milk
- ¼ cup water
- ¼ cup unsalted butter, softened
- 1 egg
- 3 ½ cups bread flour
- ¼ cup sugar
- 1 tsp salt
- 2 ¼ tsp instant yeast
- Start the Machine:
Select the “Dough” cycle and let the machine work its magic—this typically takes about 90 minutes.
First Rise in the Machine
During the dough cycle, your bread machine will handle the first rise. It’s important not to open the lid during this phase, as it can interrupt the warm environment that’s crucial for rising.
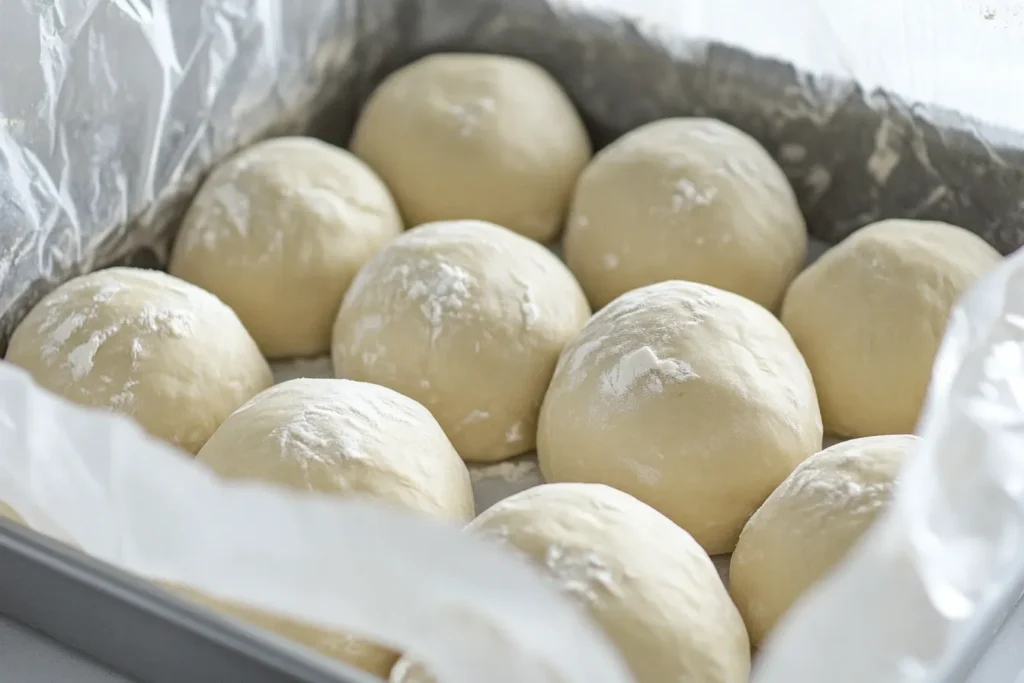
Shaping the Rolls
Once the dough cycle is complete:
- Remove the Dough:
Lightly flour your hands and a clean surface. Gently turn the dough out and divide it into 12 to 15 equal pieces. - Form the Rolls:
Roll each piece into a ball by tucking the edges underneath to form a smooth top. - Arrange on a Baking Pan:
Place rolls in a greased 9×13 inch pan or on a parchment-lined baking sheet, spacing them evenly.
Second Proof Outside the Machine
Let the shaped rolls rise a second time in a warm, draft-free area for about 30–45 minutes, or until nearly doubled in size. Cover loosely with plastic wrap or a clean kitchen towel.
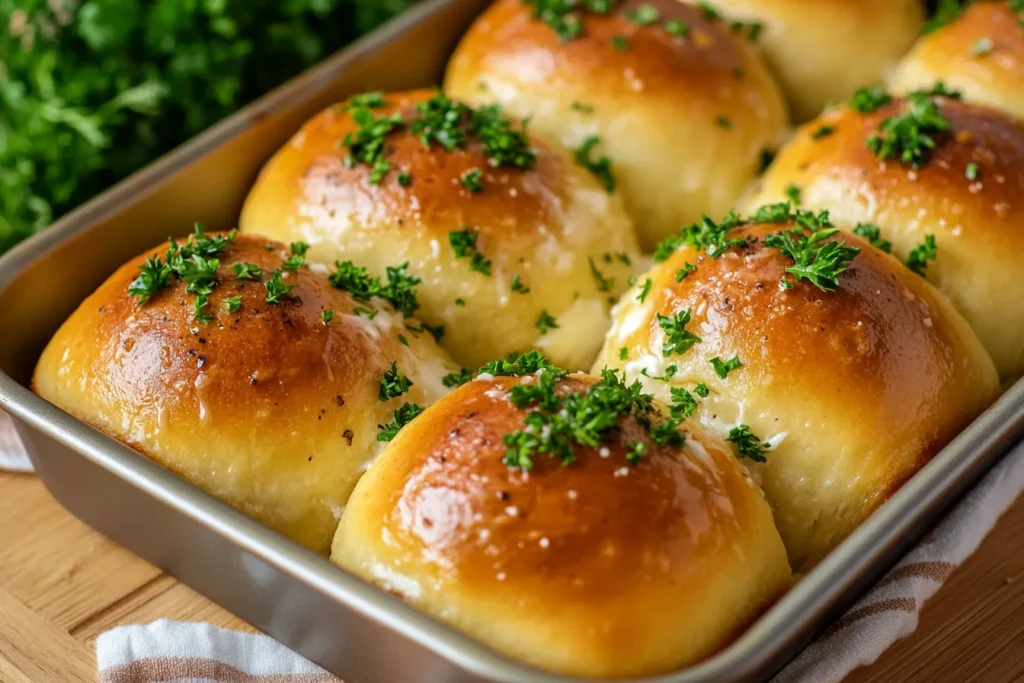
Baking & Finishing Touches
- Preheat the Oven:
Set your oven to 375°F (190°C) during the second proofing. - Bake:
Place the rolls in the oven for 12–15 minutes or until golden brown on top and hollow-sounding when tapped. - Optional Brushing:
As soon as they come out, brush the tops with melted butter for an extra tender, glossy finish.
Tips for Ultimate Fluffiness
While the bread machine does much of the hard work, there are a few extra tricks to help you get the softest, pillowy rolls possible.
How to Check Dough Hydration
- Not Too Dry, Not Too Sticky:
Dough should feel soft and slightly tacky, but not sticky. If it feels dry, add a tablespoon of warm water. If it’s too wet, sprinkle in a little flour. - Windowpane Test:
After kneading, stretch a small piece of dough. If it stretches thin without tearing (like a windowpane), you’ve got well-developed gluten—a key for fluffy rolls.
Proper Proofing Techniques
- Warm Environment:
Proofing in a warm (but not hot) area helps the yeast do its job. If your kitchen is cool, place your dough in a slightly warmed (and turned off) oven. - Don’t Overproof:
Rolls that rise too long can collapse during baking. Stop proofing when the dough has just doubled, not more.
Storage & Reheating Best Practices
Your fluffy dinner rolls will taste just as delicious the next day—if you store and reheat them the right way.
Storing in Airtight Containers
- Short-Term:
Let rolls cool completely before placing in an airtight container. Store at room temperature for up to 3 days. - Freezing:
Freeze leftover rolls in a resealable plastic bag for up to 2 months. Reheat directly from frozen or thaw at room temp.
Reheat Without Drying Out
- Microwave Method:
Wrap rolls in a damp paper towel and microwave for 15–20 seconds. - Oven Method:
Cover rolls loosely with foil and warm in a 300°F (150°C) oven for 10 minutes.
Variations & Flavor Boosters
Once you’ve mastered the base recipe, try mixing things up with creative flavors that suit any meal or occasion.
Garlic & Herb Rolls
- Add 1 tsp garlic powder and 2 tbsp finely chopped fresh herbs (like rosemary or parsley) to the dough before starting the bread machine.
- Optional: Brush baked rolls with garlic butter for an aromatic finish.
Sweet Honey Butter Rolls
- Replace 2 tbsp of sugar with honey for a subtle sweetness.
- Brush finished rolls with melted honey butter and a pinch of sea salt for a sweet-savory flavor.
FAQ
Can I freeze bread machine dinner rolls after baking?
Absolutely! Once the rolls are completely cooled, place them in a freezer-safe bag or airtight container. They can be frozen for up to 2 months. To reheat, warm them in a 300°F (150°C) oven wrapped in foil or microwave briefly until soft.
What setting should I use on my bread machine?
Use the “Dough” setting if you plan to bake the rolls in your oven. This setting mixes, kneads, and proofs the dough. Avoid using the full “Bread” setting, as it bakes the loaf inside the machine rather than forming rolls.
Can I make the dough ahead of time and bake later?
Yes. After the first rise in the bread machine, you can refrigerate the shaped dough for up to 24 hours. When ready to bake, let the rolls come to room temperature and rise again until doubled before placing them in the oven.
How do I get a golden crust on top of my rolls?
Brush the tops of your rolls with milk or an egg wash (beaten egg + water) before baking. After baking, brushing with melted butter adds shine and extra softness.
What’s the difference between bread flour and all-purpose flour for rolls?
Bread flour has more protein, which helps create stronger gluten development, resulting in chewier and airier rolls. All-purpose flour works too but may produce slightly denser rolls.
Why did my rolls come out dense and heavy?
This could be due to under-kneading, expired yeast, incorrect liquid ratios, or not allowing enough time for the dough to rise. Always double-check ingredient freshness and proofing time.
Conclusion & Final Thoughts
There’s nothing quite like pulling a tray of golden, fluffy, and tender bread machine dinner rolls out of the oven. With the help of a bread machine and the right techniques, you can turn simple ingredients into bakery-worthy rolls with minimal effort.
From understanding the role of ingredients to perfecting proofing and baking, this guide offers everything you need to succeed. Whether you’re making rolls for Thanksgiving, Sunday dinner, or just a comforting weeknight meal, this foolproof recipe will become a staple in your kitchen.
And remember, don’t be afraid to experiment. Try adding herbs, garlic, or honey to customize the flavor to suit your family’s preferences. Once you’ve mastered the basics, the possibilities are endless.
So grab your bread machine, gather your ingredients, and let’s make every meal a little warmer, softer, and more delicious—one roll at a time.

Name: Fluffy and Tender Bread Machine Dinner Rolls
Ingredients
Equipment
Method
- Instructions:
- Add milk, water, butter, and egg to the bread machine pan.
- Add flour, sugar, and salt. Make a small well and add the yeast on top.
- Set the bread machine to the “Dough” cycle and start.
- Once complete, remove the dough and divide into 12–15 even pieces.
- Shape into balls and place in a greased 9×13-inch pan.
- Cover and let rise for 30–45 minutes, or until doubled.
- Preheat oven to 375°F (190°C).
- Bake for 12–15 minutes or until golden brown.
- Optional: Brush with melted butter immediately after baking.