
Introduction
When it comes to classic comfort foods, chicken tenders stand tall at the top of the list. These golden, crispy strips of juicy chicken have won the hearts of kids and adults alike, becoming a staple on restaurant menus and family dinner tables. But what if you could enjoy restaurant-style chicken tenders at home, without the grease or fuss? That’s exactly what this easy baked chicken tenders recipe offers: maximum crunch, minimal mess, and healthier satisfaction.
Whether you call them chicken fingers, chicken strips, or chicken goujons, there’s no denying the universal appeal of these breaded bites. This recipe focuses on oven-baked tenders, achieving that crave-worthy crunch without deep-frying. Thanks to a simple panko breading technique and a few flavor-boosting ingredients, you can get golden perfection with far fewer calories and much less hassle..Spicy Chicken Tenders
In this guide, you’ll learn exactly how to prep, season, and bake the best chicken tenders, plus get answers to common questions like safe chicken handling, cooking times, and storage tips. Let’s dive in and discover how to make the best homemade chicken tenders that will rival any fast-food joint!
What Are Chicken Tenders?
Understanding the Chicken Tenderloin
Chicken tenders come from a small, tender strip of meat located just beneath the chicken breast — known as the chicken tenderloin. This cut is naturally more tender and juicy, making it ideal for quick-cooking methods like baking or frying. Unlike larger chicken breasts, tenderloins require less cooking time and tend to stay moist and flavorful.
Chicken Tenders vs. Chicken Strips
While people often use the names interchangeably, there’s a technical difference. True chicken tenders use the tenderloin, while chicken strips are usually cut from the breast meat. Either way, breading and baking methods work perfectly with both cuts, but tenderloins generally deliver a softer bite..Chicken Tenders and Fries
Why Baked Chicken Tenders?
Health Benefits of Baking
Traditional chicken tenders are deep-fried in oil, adding unnecessary fat and calories. Baking, on the other hand, creates a similar golden crust with a fraction of the oil, resulting in a healthier dish without sacrificing taste.
Heading 3: Less Mess in the Kitchen
Deep-frying at home can be intimidating — hot oil splashes, lingering odors, and messy cleanup. By baking your tenders, you avoid all that hassle. With a simple oven setup and a baking rack, you’ll still achieve that irresistible crispness with far less mess.
Family-Friendly and Kid-Approved
These baked chicken tenders are perfect for busy weeknights, picky eaters, and meal prep. They reheat beautifully in the oven or air fryer, making leftovers just as tasty as the first day. Plus, kids love dunking them in their favorite sauces!
Ingredients for Homemade Chicken Tenders
Chicken Tenderloins
Fresh, high-quality chicken tenderloins are best for this recipe. If you can’t find them, you can slice boneless skinless chicken breasts into thin strips.
Panko Breadcrumbs
Panko creates a lighter, crunchier coating compared to regular breadcrumbs. Combined with a small amount of oil or cooking spray, it browns beautifully in the oven.
Seasonings and Flavor Boosters
Salt, black pepper, garlic powder, paprika, and onion powder are classic flavor enhancers. Feel free to add dried herbs like oregano or thyme for extra dimension.
Binding Ingredients
Eggs help the breading stick, while a little flour provides a dry base for the panko to cling to. This layering method guarantees an even, crispy crust.
Optional: Parmesan Cheese
A handful of finely grated Parmesan adds a savory, cheesy boost to your breading mixture. It browns well and pairs beautifully with chicken.
How to Make Chicken Tenders Step-by-Step
Homemade chicken tenders might look complicated, but with the right steps, you can master them with ease. Let’s break it down so you can have crunchy, delicious tenders every time.
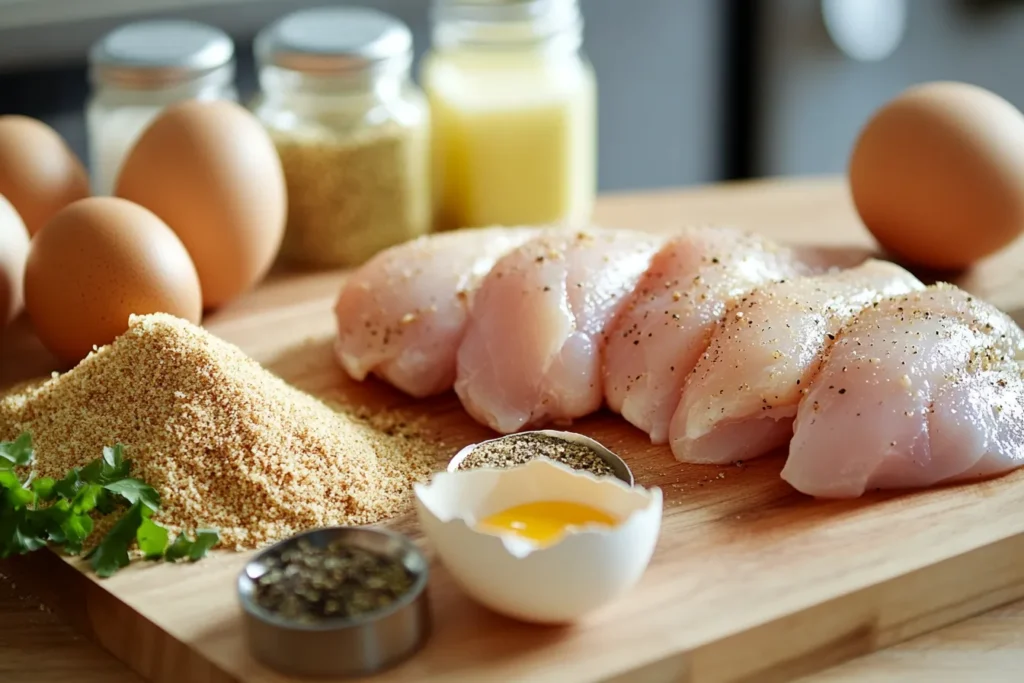
Step 1 – Prepare Your Ingredients
First, gather all your ingredients. Lay out your chicken tenderloins, flour, beaten eggs, panko breadcrumbs, and seasonings. Preheat your oven to 425°F (220°C) and line a baking sheet with parchment paper. Placing a wire rack on top of the baking sheet will help the tenders crisp up evenly without sticking to the pan.
Step 2 – Season the Chicken
Pat your chicken tenderloins dry with paper towels. Then, season them generously with salt, pepper, garlic powder, and paprika. Don’t be afraid to add a dash of cayenne if you like a spicy kick. Seasoning the meat directly ensures every bite is flavorful.
Step 3 – Dredge and Coat
Set up a breading station with three shallow bowls: one with flour, one with beaten eggs, and one with the seasoned panko breadcrumb mixture. Start by dredging each tenderloin in the flour, shaking off any excess. Next, dip it into the beaten eggs, letting the excess drip off. Finally, press the chicken into the panko mixture, coating evenly on all sides.
Step 4 – Arrange on the Rack
Place the breaded chicken tenders on your prepared wire rack. Lightly spray them with cooking oil to encourage a golden-brown finish in the oven. This is the secret to getting a deep-fried crunch without the deep-frying!
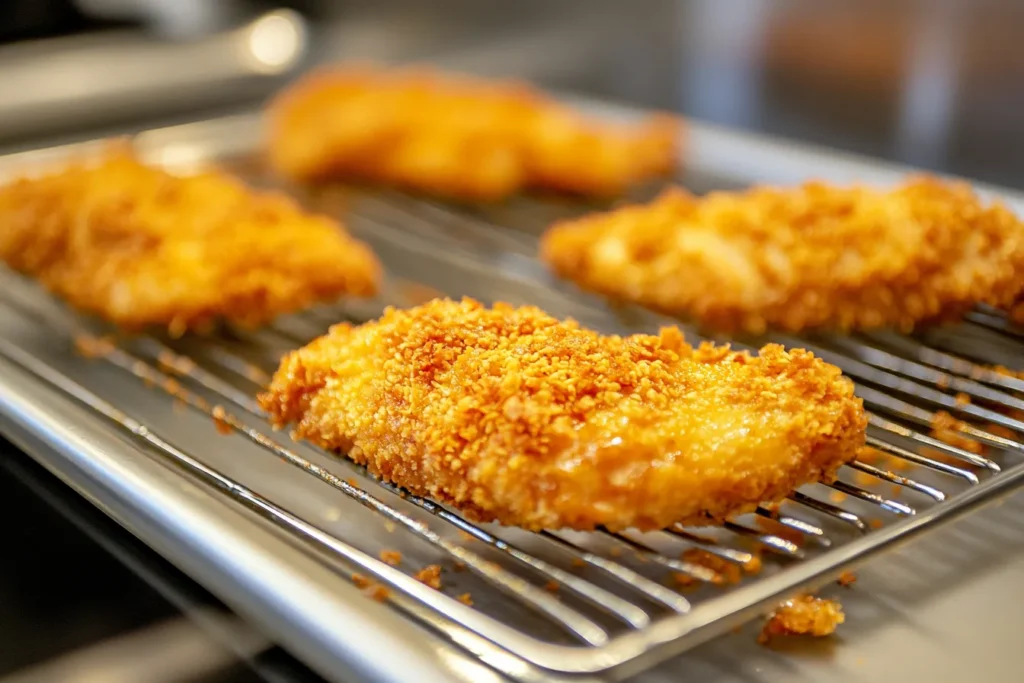
Step 5 – Bake to Perfection
Slide your pan into the oven and bake the chicken tenders for about 15–18 minutes, flipping them halfway through to ensure even browning. The tenders are done when they are golden and cooked through to an internal temperature of 165°F (74°C), which you can verify using a meat thermometer. For more information on safe poultry temperatures, see the USDA Poultry Guidelines.
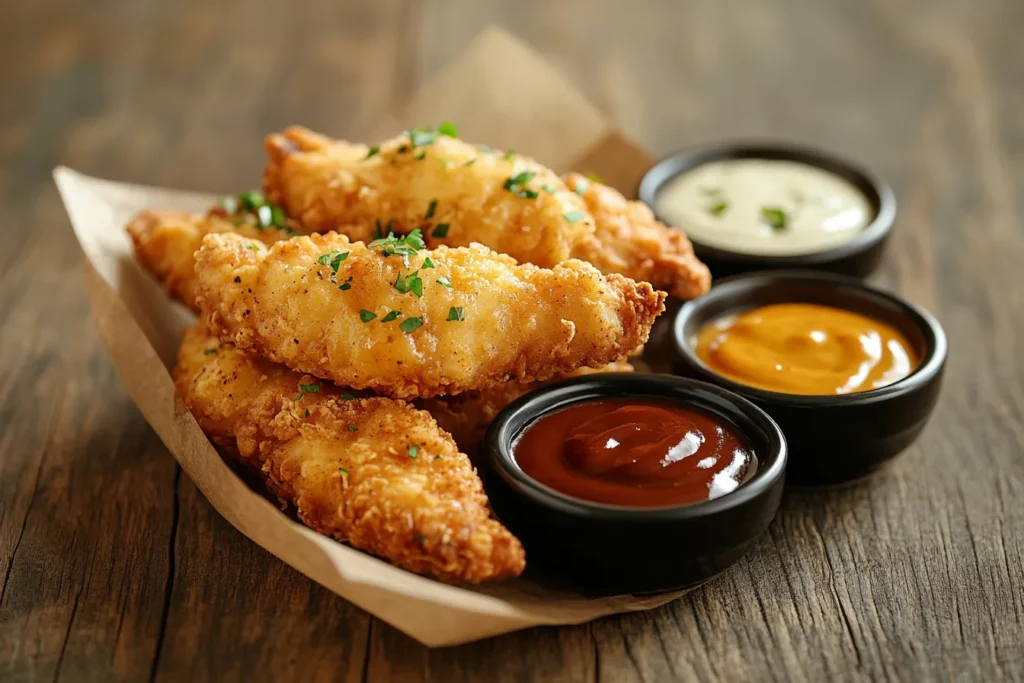
Step 6 – Serve Hot
Let the tenders rest for a couple of minutes before serving so the juices settle. Pair them with your favorite sauces — honey mustard, barbecue, or ranch are classics — or get creative with spicy sriracha mayo or garlic aioli.
Pro Tips for Crispy Oven-Baked Chicken Tenders
Use a Wire Rack
If you place your tenders directly on the baking tray, they can become soggy on the bottom. Elevating them on a wire rack allows hot air to circulate, making them crispy on all sides.
Spray with Oil
Don’t skip spraying with a little cooking oil. It gives the breadcrumbs that essential golden color and satisfying crunch, similar to a fried finish.
Don’t Overcrowd the Pan
Leave enough space between each chicken tender so they can cook evenly. Overcrowding traps moisture, which can make the breading soggy instead of crispy.
Variations on Chicken Tenders
Gluten-Free Chicken Tenders
For a gluten-free version, simply replace the flour with gluten-free all-purpose flour and the panko with gluten-free breadcrumbs. Everything else stays the same!
Air Fryer Chicken Tenders
You can also make these chicken tenders in the air fryer. Set it to 400°F (200°C) and cook for 10–12 minutes, flipping halfway. The air fryer uses circulating hot air to achieve a crispy texture with even less oil.
Spicy Chicken Tenders
Add chili flakes, cayenne pepper, or hot sauce to the egg wash for a fiery twist. Serve them with a cool ranch dip to balance the heat.
Nutritional Benefits of Chicken Tenders
Lean Protein
Chicken tenderloins are naturally lean and high in protein, making them a great option for building muscle and keeping you full longer.
Low in Saturated Fat
By baking instead of frying, you reduce saturated fat while still enjoying a crunchy, satisfying meal.
Kid-Approved Nutrients
Kids love chicken tenders, and as long as you bake them and pair them with healthy sides like carrot sticks or sweet potato fries, you can feel good about serving them often.
For more inspiration and advanced recipe variations, you might check out this detailed guide on chicken fingers recipe ideas.
Best Dipping Sauces for Chicken Tenders
Chicken tenders aren’t complete without a delicious dipping sauce. The right sauce can take your baked tenders from tasty to downright addictive. Here’s a look at some of the best sauces you can serve with your crispy chicken tenders.
Classic Honey Mustard
Honey mustard is the ultimate partner for crispy chicken tenders. The sweetness of honey combined with tangy mustard makes a balanced dip that complements the savory crunch of the tenders perfectly. You can make it at home with just Dijon mustard, honey, and a splash of vinegar — far tastier than store-bought.
Creamy Ranch
Ranch is an all-time favorite, especially among kids. Its cool, herby creaminess soothes any spice and adds an extra layer of flavor. For a healthier twist, make your own ranch with Greek yogurt instead of mayonnaise.
Spicy Sriracha Mayo
If you like a little heat, sriracha mayo is a great pick. Blend mayonnaise with sriracha, a squeeze of lime juice, and a pinch of garlic powder. This spicy, creamy sauce pairs amazingly with crispy chicken tenders.
Barbecue Sauce
A smoky, slightly sweet barbecue sauce brings a bold, rich flavor that stands up to the crunch of chicken tenders. Look for a sauce with natural ingredients, or try making your own with ketchup, brown sugar, Worcestershire sauce, and a touch of smoked paprika.
Chicken Tenders for Meal Prep
Chicken tenders are fantastic for meal prepping because they store and reheat so well. Here’s how to do it right.
Storing
Once baked, let the chicken tenders cool completely. Store them in an airtight container in the refrigerator for up to four days. This makes them easy to grab for quick lunches or busy weeknight dinners.
Reheating
To keep them crispy, reheat the tenders in a 375°F (190°C) oven or an air fryer for about 5–8 minutes until warmed through. Avoid the microwave, which can make them rubbery and soggy.
Freezing
You can also freeze chicken tenders. After baking and cooling, place them on a baking sheet in a single layer and freeze until solid. Then transfer to a freezer-safe container or bag for up to 3 months. Reheat straight from frozen in the oven for the best results.
Safety Tips for Cooking Chicken
Food safety is critical when working with raw poultry. Improper handling can lead to foodborne illnesses, so always follow these guidelines.
Avoid Cross-Contamination
Use separate cutting boards and utensils for raw chicken and other ingredients. Wash your hands thoroughly before and after handling raw chicken to prevent spreading bacteria. Learn more about safe chicken handling to protect your family.
Cook to Proper Temperature
Always cook chicken to a safe internal temperature of 165°F (74°C). This ensures any harmful bacteria are killed and your chicken is safe to eat. Using a food thermometer is the best way to check doneness.
Clean Surfaces Thoroughly
Disinfect countertops, sinks, and any tools that came in contact with raw chicken using hot, soapy water or a food-safe disinfectant.
Chicken Tenders FAQs
Here are some of the most common questions people have about making and enjoying chicken tenders.
Can I make chicken tenders ahead of time?
Yes! You can prep and bread the chicken tenders, then refrigerate them on a baking sheet for up to 8 hours before baking. This makes dinner time a breeze.
What’s the best way to keep tenders crispy?
Baking them on a wire rack and spraying them lightly with oil is key. Also, avoid overcrowding the pan so air can circulate properly.
Can I use chicken breast instead of tenderloins?
Absolutely. Just slice boneless, skinless chicken breasts into strips about 1 inch thick, and follow the same breading and baking process.
Can I fry these instead of baking?
Yes, if you prefer frying, heat about 1 inch of oil in a skillet to 350°F (175°C) and cook the breaded tenders for about 3–4 minutes per side until golden brown.
How do I make them spicier?
Add cayenne pepper, chili powder, or hot sauce to the egg wash or breadcrumb mixture for extra heat.
Are baked tenders healthier than fried?
Yes! Baking uses far less oil, reducing calories and saturated fat while still giving you a deliciously crispy result.
Serving Suggestions for Chicken Tenders
Chicken tenders are incredibly versatile and can be served in countless creative ways beyond the classic “basket with fries.” Here are some tasty serving ideas to inspire your next meal.
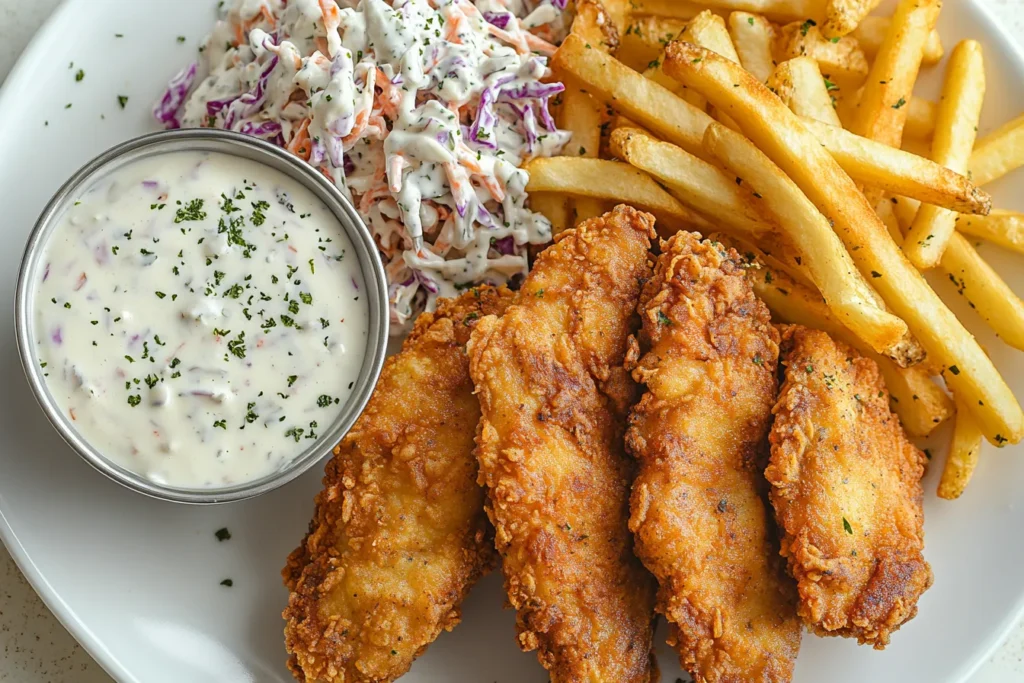
As a Main Course
Serve chicken tenders with a simple side salad, roasted vegetables, or steamed broccoli for a balanced, wholesome meal. You can also pair them with sweet potato fries or coleslaw for a classic comfort-food twist.
In Wraps or Sandwiches
Slice your crispy tenders and tuck them into a warm wrap or sandwich with lettuce, tomatoes, onions, and your favorite sauce. It’s a quick, hearty lunch option that’s easy to pack and carry.
With Waffles
Yes, you read that right — chicken and waffles is a beloved brunch combo. Drizzle with a little honey or maple syrup for a sweet-and-savory masterpiece that will impress any guest.
As Party Appetizers
Cut tenders into smaller bites and serve them on skewers with a variety of dipping sauces. They make an easy-to-eat, crowd-pleasing party appetizer.
Sides That Pair Perfectly with Chicken Tenders
Fries and Potato Wedges
No doubt, crispy fries or potato wedges are a top choice with chicken tenders. Whether you opt for regular fries or sweet potato wedges, they bring that familiar, satisfying flavor.
Coleslaw
Creamy, tangy coleslaw adds a refreshing crunch that balances the richness of the tenders. Try making your own with shredded cabbage, carrots, vinegar, and a touch of mayo.
Roasted Veggies
If you want to keep things healthier, pair your chicken tenders with roasted carrots, zucchini, or Brussels sprouts. The caramelized flavors of roasted veggies complement the tender chicken beautifully.
Mac and Cheese
For the ultimate comfort meal, combine chicken tenders with a creamy, cheesy macaroni and cheese. It’s guaranteed to make any kid (or adult!) smile.
How to Store and Freeze Chicken Tenders
Refrigerating
Store leftovers in an airtight container in the fridge for up to four days. To maintain crispiness, place a paper towel underneath to absorb any moisture.
Freezing
Place cooled tenders on a baking sheet and freeze until solid. Transfer to freezer bags, squeezing out as much air as possible. They’ll keep for up to three months.
Reheating
Reheat tenders in the oven or air fryer for 5–8 minutes to restore their crunchy texture. Avoid microwaving if possible, since it makes them soggy.
Tips for Making Restaurant-Quality Chicken Tenders at Home
Double-Coat for Extra Crunch
If you really want a super-crispy crust, double-dip your chicken: dredge in flour, then egg, then breadcrumbs — and repeat the egg and breadcrumbs step once more.
Season Every Layer
Don’t just season the chicken — season the flour and breadcrumb mixture too. Layers of flavor ensure no bland bites.
Use a Thermometer
A simple meat thermometer guarantees your chicken is perfectly cooked without drying out. Always aim for an internal temperature of 165°F (74°C).
Marinate for Added Flavor
If you have time, marinate the chicken tenderloins in buttermilk with a dash of hot sauce for a couple of hours. This helps tenderize the meat and boosts flavor.
Advanced Flavor Twists
Garlic Parmesan Chicken Tenders
Add grated Parmesan and a bit of minced garlic to your breadcrumb mixture for a restaurant-style flavor bomb.
Herb Crusted Chicken Tenders
Mix fresh or dried herbs like thyme, rosemary, and parsley into the panko for a fragrant crust.
Buffalo-Style Chicken Tenders
Toss your cooked tenders in buffalo wing sauce and serve with a side of ranch dressing for a spicy, tangy variation.
Frequently Asked Questions About Chicken Tenders
What is the best cut of chicken for tenders?
The best cut is the chicken tenderloin, which is the strip of meat right under the chicken breast. It’s naturally tender and cooks quickly, making it perfect for breaded tenders. If you can’t find tenderloins, thinly sliced chicken breasts work just as well.
Can I make chicken tenders without breadcrumbs?
Yes! You can use crushed cornflakes, crushed crackers, or even almond flour for a gluten-free and low-carb option. These alternatives still provide a delicious, crispy texture.
Why are my baked chicken tenders soggy?
The main reason is overcrowding the pan, which traps steam and prevents proper browning. Also, skipping the wire rack means moisture can collect underneath. Always leave space between tenders and elevate them for the crispiest results.
Can I make chicken tenders dairy-free?
Definitely. Just skip any cheese additions in the breading, and use dairy-free milk if you choose to marinate the chicken.
Can I use the same recipe for chicken nuggets?
Yes! Just cut the chicken into smaller, bite-sized pieces and follow the same breading and baking steps. Adjust the cooking time to about 10–12 minutes, checking for doneness at 165°F (74°C).
What is the best way to reheat leftover chicken tenders?
For best results, reheat them in a 375°F (190°C) oven or air fryer for 5–8 minutes. This way, they stay crispy and delicious instead of turning mushy like they might in a microwave.
Are chicken tenders healthy?
When you bake them instead of deep-frying, chicken tenders can be a nutritious source of lean protein with relatively low saturated fat. Pair them with healthy sides like roasted veggies for a balanced meal.
Conclusion
Chicken tenders are more than just a fast-food favorite — they’re a family-friendly classic that you can make healthier and even more delicious right at home. By baking instead of frying, you keep all the crunch and flavor without the excess grease. Plus, you can customize your breading, seasonings, and dips to match any taste preference, making these tenders a true crowd-pleaser.
Whether you serve them for a quick weeknight dinner, a kid-approved lunchbox meal, or a game-day party snack, these easy, golden-brown chicken tenders will deliver every time. Remember to use safe kitchen practices, cook to the correct temperature, and experiment with flavors to keep your meals exciting.
Ready to ditch store-bought and make your own? Give this crispy, oven-baked chicken tenders recipe a try — your taste buds will thank you.
Name: Crispy Baked Chicken Tenders
Ingredients
Equipment
Method
- nstructions:
- Preheat your oven to 425°F (220°C). Line a baking sheet with parchment paper and place a wire rack on top.
- Pat the chicken tenderloins dry and season with salt, pepper, garlic powder, and paprika.
- Prepare three shallow bowls: one with flour, one with beaten eggs, and one with panko breadcrumbs mixed with Parmesan (if using).
- Coat each tender first in flour, then dip in the beaten eggs, then coat in the panko mixture, pressing to help it stick.
- Place the breaded tenders on the prepared rack and lightly spray with cooking oil.
- Bake for 15–18 minutes, flipping halfway through, until golden brown and cooked through (internal temperature 165°F/74°C).
- Serve hot with your favorite dipping sauces.