
Introduction
Who can resist a sweet, fluffy, delightfully small donut? Mini donuts have exploded in popularity for a reason — they’re fun, bite-sized, and absolutely adorable. Whether you’re enjoying them at a fairground, at a bakery, or fresh from your own oven, mini donuts capture all the magic of classic donuts in a more manageable form.
Beyond their charming looks, mini donuts offer a world of flavor, texture, and creative possibilities. They’re perfect for birthdays, brunches, holiday parties, or even as edible gifts. In this long-form guide, you’ll discover everything you need to know about making, serving, and storing these little rings of happiness. From the best pans and ingredients to irresistible glaze ideas and creative decorating, we’ll cover it all.
So, tie on your apron, grab a whisk, and get ready to master the art of mini donuts from scratch — your kitchen is about to smell like heaven!
What Are Mini Donuts?
Mini donuts are exactly what they sound like: scaled-down versions of the classic donut, typically around 2 inches in diameter. They can be cake-style or yeast-raised, and they’re usually made in a special mini donut pan or even fried with mini donut molds. Thanks to their smaller size, they cook quickly, cool faster, and are easier to decorate or portion out for guests..Boston Kreme Dunkin Donut Guide
These tiny confections are especially popular at festivals, carnivals, and farmer’s markets because they’re easy to eat on the go. Their charm lies in that perfect, poppable size that brings a bit of childhood nostalgia with every bite. Today, you’ll even find mini donuts in trendy coffee shops and upscale bakeries, topped with everything from classic cinnamon sugar to artisan chocolate ganache..Boston Kreme Dunkin Donut Guide You’ll Love
A Brief History of Mini Donuts
While no one knows the precise moment mini donuts first appeared, donuts themselves have been around for centuries. Food historians trace the donut’s roots back to Dutch settlers in early America, who made “olykoeks” or “oil cakes,” deep-fried dough balls dusted in sugar. These evolved over time into the ring-shaped donuts we know today.
Mini donuts took off in popularity in the mid-20th century with the rise of traveling fairs and street festivals, where vendors needed a quick, crowd-pleasing, easy-to-serve snack. Their size, portability, and irresistible flavor made them a massive hit — and they haven’t looked back since.
Why Are They So Popular?
Mini donuts combine a fun, social eating experience with the nostalgia of a classic treat. People love sharing a warm paper bag of mini donuts fresh from a fair stand, their sugary coating melting into sticky fingers. Their smaller size makes them less guilt-inducing than full-sized donuts, and their flexibility in decoration and flavor means there’s something for everyone.
Mini donuts also ride the wave of the mini-dessert trend, which has taken off in the past decade. Consumers are drawn to portion-controlled sweets that look good on social media — and mini donuts check every box, from Instagram-worthy cuteness to total crowd-pleasing taste..No Bake Protein Cheesecake

Why Make Mini Donuts at Home?
While mini donuts from a carnival or bakery are amazing, there’s something truly special about making them at home. You have complete control over flavors, ingredients, and presentation — and you can whip them up fresh whenever a craving strikes. Let’s explore why homemade mini donuts might just become your new go-to dessert.
Portion Control
Mini donuts are naturally portion-friendly thanks to their size, but baking them at home takes that one step further. You decide how many to make, whether you want to share a dozen or enjoy just a couple. Smaller treats help you satisfy your sweet tooth without going overboard, which is a huge plus for mindful eaters.
Cost Savings
Buying mini donuts from a gourmet bakery can add up fast — especially if you’re serving a crowd. But making your own mini donuts at home is far more affordable. With pantry staples like flour, sugar, baking powder, and a bit of oil or butter, you can make dozens of donuts at a fraction of the bakery price. This makes them perfect for parties, bake sales, and large gatherings..Cheesecake Lady
Freshness and Quality
Homemade means fresh. Nothing compares to warm mini donuts straight out of the oven (or fryer) with a sugar coating that hasn’t had a chance to get soggy. You can avoid artificial additives and preservatives, control your sugar levels, and even choose organic or specialty ingredients if you’d like. The result? Donuts that taste better and make you feel better about indulging.
Tools & Ingredients You’ll Need
Before you start mixing, let’s gather the essential tools and ingredients to guarantee mini donut success.
Essential Tools
Mini Donut Pan: If you’re baking, a nonstick mini donut pan is a must. It gives you consistent shapes and makes cleanup a breeze.
Cooling Rack: A cooling rack is crucial so air can circulate, keeping your donuts from getting soggy on the bottom.
Piping Bag: Getting the batter neatly into those little cavities is so much easier with a piping bag or a zip-top bag with the corner snipped off.
Mixing Bowls, Whisk, and Measuring Cups: Classic baking tools that no kitchen should be without.
Frying Option: If you want to fry, you’ll need a deep fryer or a heavy pot with a thermometer for precise temperature control..Fig Ice Cream Recipe
Best Ingredients for Flavor
- All-purpose flour: the go-to base for soft, cakey donuts
- Sugar: white granulated for classic sweetness
- Baking powder & baking soda: essential leaveners
- Salt: a pinch to balance sweetness
- Eggs: for richness and structure
- Buttermilk or milk: for tenderness and tang
- Butter or oil: to keep the donuts moist
- Flavorings: vanilla, cocoa powder, lemon zest, or pumpkin spice depending on the variety
Fresh, high-quality ingredients make all the difference — they’re what separate a bland donut from a bakery-quality masterpiece.

Baked vs. Fried Mini Donuts
One of the biggest questions home bakers ask is whether to bake or fry. Let’s compare.
Healthier Baking Option
Baking mini donuts is a healthier choice because you skip the deep-frying step. Less oil means fewer calories and less saturated fat, which is great if you’re watching your intake. Baked donuts also tend to have a cake-like crumb, which many people love.
Beyond nutrition, baked donuts are easier to make with less mess — no worrying about splattering oil or tricky cleanup. Pop them in the oven, wait a few minutes, and you’re good to go.
Classic Fried Donuts
If you want the ultimate crispy outside with a fluffy, airy interior, frying wins. There’s no denying that fried donuts have that nostalgic, fairground flavor we grew up loving.
Frying takes a bit more effort — you’ll need to heat oil to the proper temperature, carefully lower in your batter, and flip them for even cooking. But for many donut fans, that authentic fried flavor is worth every extra minute.
Step-by-Step Recipe for Mini Donuts
Mini donuts are surprisingly simple to make once you gather your ingredients and tools. Here’s a detailed, foolproof recipe for classic vanilla mini donuts, followed by a couple of fun variations you can try.
Classic Vanilla Mini Donuts
Ingredients:
- 1 cup all-purpose flour
- 1/3 cup granulated sugar
- 1 teaspoon baking powder
- 1/4 teaspoon baking soda
- 1/4 teaspoon salt
- 1/2 cup buttermilk
- 1 large egg
- 2 tablespoons melted butter
- 1 teaspoon vanilla extract
Instructions:
- Preheat your oven to 350°F (175°C).
- Lightly grease your mini donut pan with nonstick spray or a bit of melted butter.
- In a large bowl, whisk together the flour, sugar, baking powder, baking soda, and salt.
- In a second bowl, whisk the buttermilk, egg, melted butter, and vanilla extract.
- Pour the wet ingredients into the dry and gently fold until just combined. Avoid overmixing to keep the donuts soft and fluffy.
- Transfer the batter to a piping bag and fill each donut cavity about 2/3 of the way full.
- Bake for 8–10 minutes until golden and a toothpick inserted comes out clean.
- Allow to cool in the pan for 2–3 minutes, then move to a cooling rack.
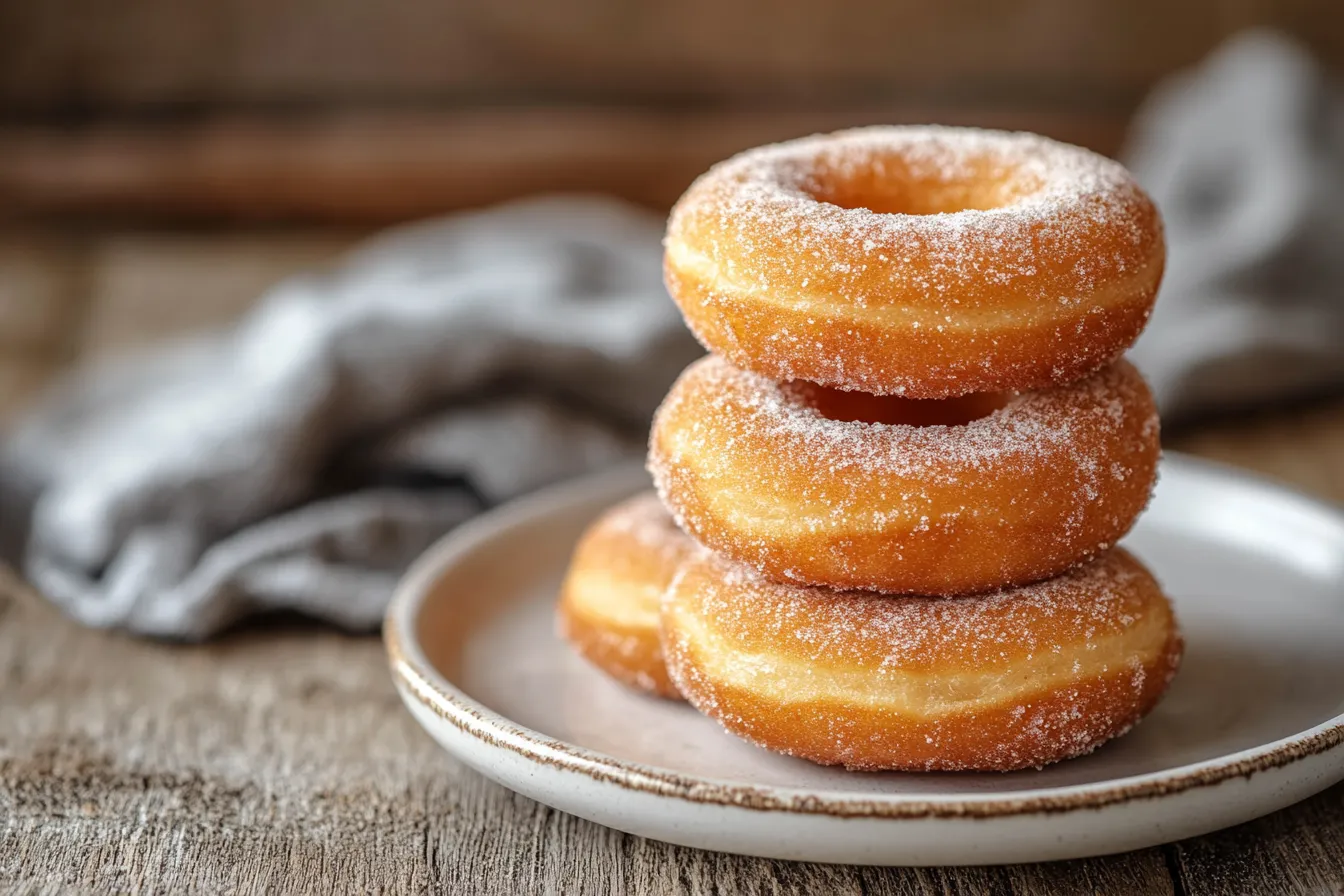
Enjoy them plain, or roll them in cinnamon sugar while warm for a classic twist!
Chocolate Mini Donuts
For a chocolatey version, add 2 tablespoons of cocoa powder to the dry ingredients and increase the buttermilk to 2/3 cup to balance the batter. Bake as directed above, then dip in melted chocolate glaze or dust with powdered sugar.
Funfetti Mini Donuts
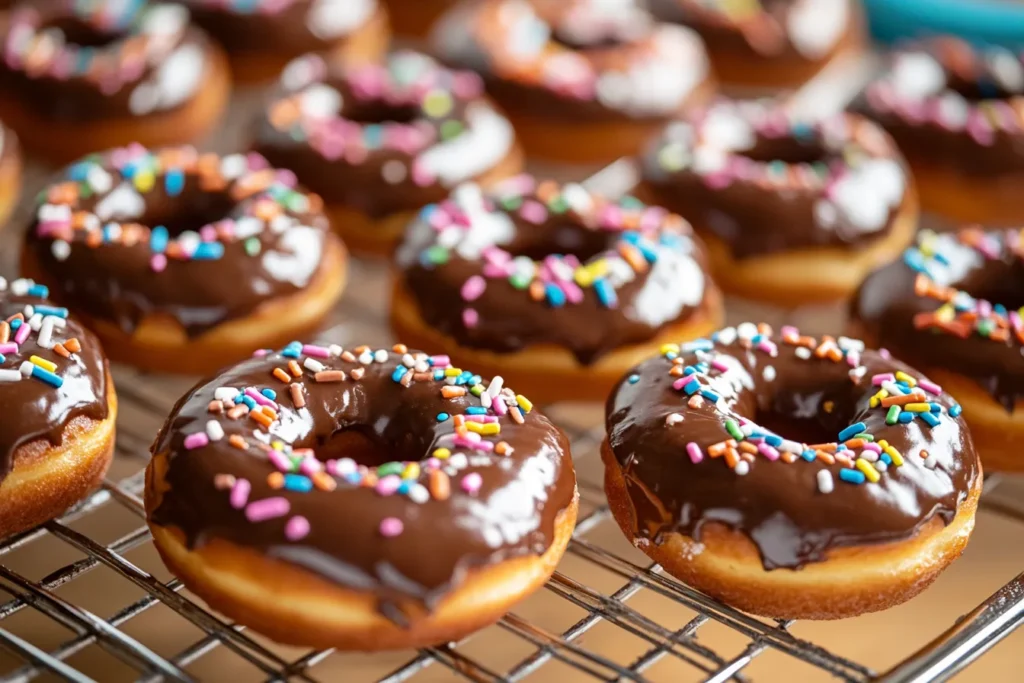
Want a party-perfect version? Fold 2 tablespoons of rainbow sprinkles into the batter before piping. Top with vanilla glaze and extra sprinkles for the ultimate birthday treat.
Delicious Toppings & Glazes
Mini donuts truly shine with creative toppings and glazes. Here are some tried-and-true favorites that never disappoint.
Cinnamon Sugar
The all-time classic! Mix 1/2 cup sugar with 1 tablespoon ground cinnamon. Dip warm donuts in melted butter, then roll them in the cinnamon sugar mixture. This coating is nostalgic, cozy, and perfect for sharing.
Chocolate Ganache
For a rich and elegant treat, melt 1/2 cup chocolate chips with 1 tablespoon butter until smooth. Dip cooled donuts in the ganache and finish with sprinkles or chopped nuts. Let them set before serving.
Fruit-Based Glazes
Bright, fruity flavors really pop on mini donuts. Here are a few ideas:
- Strawberry glaze: Blend 1/2 cup powdered sugar with 1 tablespoon strawberry puree.
- Lemon glaze: Mix 1/2 cup powdered sugar with 1 tablespoon lemon juice.
- Blueberry glaze: Crush a few blueberries into powdered sugar with a splash of water.
Fruit glazes add gorgeous color and a refreshing twist that pairs beautifully with the sweet cake base.
Decorating Mini Donuts for Parties
Mini donuts are a total showstopper at any event, and with the right presentation, they can steal the spotlight.
Serving Ideas
- Donut towers: Stack mini donuts on a tiered stand for an eye-catching centerpiece.
- Skewers: Thread 3–4 mini donuts onto a bamboo skewer for a fun, kid-friendly treat.
- Gift boxes: Place a dozen mini donuts in a decorated box as party favors.
Themed Decorations
Mini donuts are a perfect canvas for themed designs. Think:
- Red and green sprinkles for Christmas
- Orange icing for Halloween
- Pastel glazes for baby showers
- Gold dust for wedding dessert bars
Let your creativity run wild — guests will be amazed by how personal and fun mini donuts can be!
Storage and Shelf-Life
Keeping your mini donuts fresh is crucial if you want them to stay soft, moist, and delicious for days to come. Here’s how to store them properly so you never waste a single sweet bite.
Room Temperature Storage
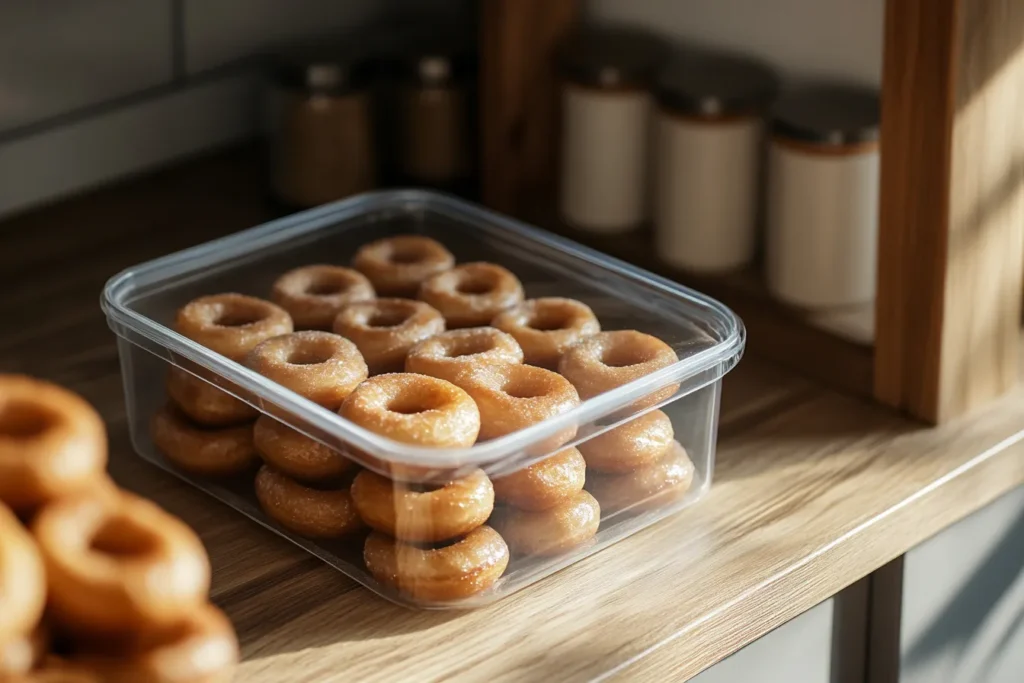
Mini donuts will stay fresh at room temperature for up to 2 days. Keep them in an airtight container lined with parchment paper to prevent them from sticking together. Make sure the container is fully sealed, as air exposure will make the donuts dry out quickly.
If you’ve glazed the donuts, place a layer of wax paper between each layer to stop the glaze from smearing or sticking.
Freezing Tips
Mini donuts freeze extremely well, making them a great make-ahead treat for parties or events. Here’s how to do it:
- Allow the donuts to cool completely after baking or frying.
- Place them on a baking sheet in a single layer, making sure they aren’t touching.
- Freeze for about 1 hour, until solid.
- Transfer the frozen donuts into a freezer-safe zip-top bag or container.
They will keep in the freezer for up to 2 months. When you’re ready to enjoy them, warm them in the microwave for 10–15 seconds, or place them in a 300°F oven for about 5 minutes.
FAQs About Mini Donuts
To wrap up this section, let’s answer some of the most common mini donut questions.
Are mini donuts healthier than regular donuts?
They can be! Because they’re smaller, you consume fewer calories per serving, and if you bake instead of fry, you skip a lot of added oil.
Can I make vegan mini donuts?
Definitely. Swap the buttermilk for plant-based milk mixed with a teaspoon of vinegar, use a flax egg instead of a chicken egg, and plant-based margarine instead of butter.
What oil is best for frying mini donuts?
Neutral oils like canola, vegetable, or sunflower oil are perfect because they have a high smoke point and won’t alter the donut flavor.
How do I keep my mini donuts moist?
Don’t overbake them, and always store them in a sealed container as soon as they’ve cooled to room temperature. A quick sugar glaze can also help lock in moisture.
Can I use whole wheat flour?
Yes, but note that whole wheat flour is heavier and will make the donuts denser. You may want to substitute only half the flour with whole wheat to keep a light texture.
Can I make gluten-free mini donuts?
Absolutely! Swap the all-purpose flour for a 1:1 gluten-free baking blend. The structure may be a bit more delicate, but the results are still delicious.
Conclusion
Mini donuts truly capture the joy of baking. From their irresistible bite-sized shape to their incredible flexibility in flavors, glazes, and decorations, they’re a perfect project for beginners and seasoned bakers alike. Whether you bake them for a children’s party, a weekend brunch, or just to treat yourself, these tiny donuts bring smiles to everyone who tries them.
So next time you’re thinking about picking up a dozen donuts from a shop, consider making them fresh at home instead. You’ll save money, have fun, and enjoy donuts that taste better than any store-bought option.

Name: Classic Vanilla Mini Donuts
Ingredients
Equipment
Method
- Instructions:
- Preheat the oven to 350°F (175°C).
- Lightly grease the mini donut pan with nonstick spray or melted butter.
- In a bowl, whisk together flour, sugar, baking powder, baking soda, and salt.
- In another bowl, combine buttermilk, egg, melted butter, and vanilla extract.
- Pour the wet ingredients into the dry ingredients and stir until just combined; do not overmix.
- Transfer batter to a piping bag and pipe into the mini donut cavities, filling each about 2/3 full.
- Bake for 8–10 minutes until lightly golden and a toothpick comes out clean.
- Cool for a few minutes in the pan, then transfer to a cooling rack.